Showing posts with label crochet thread. Show all posts

Friday, 29 March 2013

Adventures in Crochet


 If you know me you know that I am constantly wishing I had more arms.  Like an octopus.  Or like  two octopuses stuck together.  But not in the Discovery channel way.
Annnnd now that I've ooged you out...

Fall is one of my two top productive time periods because I enjoy giving hand made gifts at Christmas.  This past fall was especially productive because we were living in a temporary home without any internet. So I went crochet crazy! 


 These are coasters I made for my sister in law in her two favorite colours.


Each one was an experiment so that I could learn a new thing, or try combining things.

And the rainbow wiggle crochet coasters were made for my brother. Those are all wiggled differently too, mainly so that I wouldn't get bored.


I thought wiggle crochet would lend itself neatly to a bracelet, so I gave it a try!  This one was a treat for myself and I wear it often.


Hot pads! (are they called trivets?)


These are one of a kind. The backs are crocheted solid, some just one colour and some in a gradient. and the front is made with filet crochet and/or motif that allows the back to be seen.  I really like this idea, and plan to do more.  It's a wonderful way to bust my stash, and keep my distract-y brain from getting bored, because I am changing colours fairly often, and using different motifs every time.  I dye a lot of in between colours myself, which helps me do gradients. Pretty much every time I have a dye bath going I toss in a skein of crochet thread (or six) for fun. 


 I made two sets as well, done with Irish crochet roses at the center. My absolute favorite to do was the rainbow one. For my colour changes I crocheted in all the ends as I went so it wasn't a chore at the end. 


 And lastly, I am currently working on small wiggle crochet table runner/hot pad thingy for myself. I'm using Clea Fiesta for this bad boy.  More rainbow-y goodness!  I confess I am finding it slightly tedious, because it is all double crochet around and around and around... but it's a great take along project, and we do a fair bit of driving.


Thank you very much or stopping by!  
A quick question before I go: Do you have a favorite crafting colour combination or, if it changes like mine, what is your current one?

Happy creating!
♥
JQ

Thursday, 28 February 2013

Dying Balls of Crochet Thread!


FUN TIMES ALERT!

I have been really excited about an idea I had for dying my cotton crochet thread while it was wound in a ball.Crochet thread is my number one resource, because it is inexpensive and I use it in so many ways including: weaving on my floor loom, inkle looms, incorporating it into tapestries, knitting lace and various crochet projects.  Suffice to say I have heaps of it stashed, and a great deal of that is cream, white, or ecru. 

I found this tutorial for the process I basically want to try, except instead of with wool, which you need to do on the stove, I will be using cotton, and just dying it in ice cream pails with fairly hot water.

My happy little balls of crochet thread.  They measured roughly 2.5-3.5 inches in diameter:


I mix my dye powder (Procion MX ) into boiling water until it is completely dissolved.  I do this outdoors with a dust mask and gloves.  Once the dye powder is dissolved the particles won't go airborne and I can safely bring the dye back into my kitchen.  I never use the same supplies for dying as I use for cooking/eating.  

I made turquoise, fuchsia, bright yellow, and navy:


I mixed together very hot water, washing soda, salt and a little bit of calgon in ice cream pails until they were completely dissolved. Then I poured in the dye.  Some buckets I just used the dye solutions from one yogurt container, and for a few I mixed them.  For example, to get the indigo skein I added a bit of fuchsia to my navy bath.  For the forest green one I added some bright yellow to navy.

Below are plain turquoise and plain navy baths:


Below is the indigo yarn prior to rinsing.  It looks fairly purple, but some of the fuchsia rinsed away leaving me with my indigo. I think there were two reasons my fuchsia didn't strike the cotton fully.  I didn't leave the ball in the dye bath for a full 40 minutes, and there is also a probability that my dyes are expiring.  I don't use them fast enough. 


I had to wrap my umbrella swift up in plastic because I was unwinding each ball into a skein so that I could properly rinse out all the dye.  This is where a PVC Niddy Noddy would come in seriously handy.  Gonna have to get on that. 


All the skeins!  I love the way they look.

As you can see below, I pretty much CAN'T do a dye day without grabbing as many random pre-made skeins I can find and tossing them into the pails alongside the actual experiment.  This gives me a fun array of miscellaneous colours to play with any way I like.  It turns out several of them will work nicely in my next tapestry project (I am on pins and needles right now as I prepare to thread that bad boy up for round 2). 


Balls of pretty thread waiting to become triangular shawlettes:


I chose to stop here with the balls being very close to white at one end, but on my next run I plan to re-wind each ball with the lighter end on the outside and set them in a second dye bath, so that I have a colour on each end that hopefully meld together near the middle.  This way I can orchestrate it so that I have, say, 6 finished skeins that blend from: purple to blue (1), blue to green(2), green to yellow(3) and so on through to red. YAY RAINBOWS!

For my first experiment I chose to knit a scarf using this fabulous One Row Scarf pattern, and the indigo blue and forest green skeins (my trial runs).  My idea was to start with the indigo at one end, knit until it ran out, then begin with the lighter end of the green skein and knit to forest green at the other: 


NEAT!  I have since finished off this blue , and just picked up with the lighter end of the forest green ball.  It is incredibly difficult to pick up on the join, because the lighter ends of both balls are almost identical.  However when I hold the light end up to the original ball of cotton I took it from, the color difference is quite apparent.  So even though the balls were wound tightly the dye did seep in and change even the innermost cotton.

I am pretty excited to see how this weaves up including: on the floor loom, possibly in combination with a painted warp; on the inkle loom so that the warp changes colours in vertical stripes; and in tapestry, where I think it could be very useful alone, or in combination with several solid threads to add a bit of interest.  Also, I recently figured out knitting entrelac, which I think this process would work for!

All in all this was a tremendous success, and I learned several things!  In the future I will use only tightly wound balls and try to keep them in the dye bath for the full recommended time.  I like the crisper speckled effect for this technique, so for the most part I will refrain from wetting out the thread prior to dying.  I can get smoother gradients from the mini-skein/mason jar technique (below).  

I'm also super excited to try:

-Winding five or six short skeins, where the yarn isn't cut in between them as seen here.
-Wool yarn on the stove as seen here, here, and here. 
-Same process as above with a wool cake, but dying it in quarters.  COOL effect!
-Long Colorways using mason jars and Kool-Aid! Here.

Thanks so much for visiting my blog!  I am always excited to get feedback, so if you have any comments or questions about my process just leave me a scribble!

♥
JQ

Thursday, 21 February 2013

Inkle tutorial #2-Making Heddles

Hello Hello!

It's time for the second part of my three part Inkle tutorial! If you missed the first one on building your loom , click HERE.  I know for a fact this is not the only way to create heddles in inkle weaving.  I'm just showing you the cardboard loom version of the way I do it with my smaller looms.  I learned it this way from friend of mine one afternoon in college.

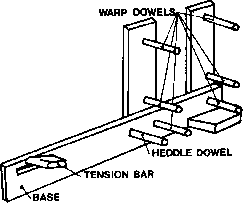
Since that tutorial I had a few questions about the two-sidedness of these looms and how they get warped.  Most of the inkle looms on the market now only have one "wall" with dowels poking out.  They look like this.  The loom I used in college looked like this.  I still have 2 double sided looms and enjoy working with them. Warping it is a little more of a pain, but it's very stable, and I remember actually weaving 5 inches wide on the one I learned with, but that's another post I think.


You will need some very strong, sturdy string for this. I recommend some kind of mattress thread or upholstery button thread, but you can also make do for now with a thick, strong sewing thread that you can't break with your fingers. Smoothness is essential to minimize fraying/breaking warp threads.I like to keep my heddles all the same length in a ziplock baggie marked for the loom I use them with.  That way I can just take out as many as I need or make more if my pattern needs. I take a measuring thread and mark both ends with a sharpie, keep it in the bag, and use it to cut all my heddles.  This way they are always the right length. 

First thing's first, run a colourful (I used red) thread from your top rear bar to your bottom front one and secure it. This will show you roughly where your band will sit as you weave.  


Next you will measure how long each heddle thread needs to be.  Without cutting, draw a good length of string off the spool.  Next take your heddle thread and loop it around the center bar,pulling both ends of the thread under and then back up around the bar and around beneath the heddle.  leave some room extra for the overhand knots.  Cut this length.  Mark the ends with a sharpie.


Don't worry about being too finicky.  As long as the string accommodates that length of red yarn, and doesn't overshoot it you should be okay.  The finicky part will be the next step.

You can cut one trial string using your  measure. Place an overhand knot about 1/4 inch from the tails, securing the two ends together and forming a loop.  Don't cut the other threads until you are sure this one will sit where you want it.


 Take the knotted end and place it behind the center bar, so that the knot is visible.


Tuck the loop end through the knotted end to secure the heddle.  Measure it against your read yarn to see if it is where you like it.  Don't worry if it's not bang on target.  just make sure it's close, and that all your heddles are the same. 


Cut each one carefully and try to place the overhand knots always in the same place on the heddle, so that the end results are all the same height when placed on the bar.  I leave about 1/4 inch tails, and have become very accurate at placing the knots.  You will find that it doesn't take much to create an uneven shed.Try your best. Make about 30.  I don't know how much inkle these little cardboard bad boys can hack, but it won't be anything much wider than that. 


TADA!!  There you have your heddles!

Bear in mind these looms are temporary things.  They probably won't stand up to the wear, tear and tension of long term weaving, so if you fall in love with the process you should definitely consider purchasing a loom.

Stay tuned for Part 3! 

Thank you very much for checking out my blog!  If there's anything you have seen in my previous posts that you'd like a tutorial on just leave me a comment!

♥ ♥ ♥ ♥ ♥ ♥ ♥
JQ

Friday, 2 September 2011

Adventures in Inkle Weaving


♥ ♥ Greetings fellow fibre junkies! ♥ ♥

First I thought I'd play around with supplemental weft. In the following two bands I have two wefts (horizontal) threads on separate shuttles: one finer and one that has 3 or more threads. I open the shed normally and throw through the fine weft, the, holding the same shed open drop selected warp threads, and shoot the thicker weft through. This allows that weft to pop up to the surface and create a pattern I couldn't make with a basic threading alone.


In this first example my supplementary weft wasn't very thick so the colours beneath shine through, but depending on the angle you see the band at the pattern becomes more or less visible:


In this band the supplemental weft is comprised of 4 strands of navy blue Clea crochet thread. The pattern is much more solid.


The Clea compresses more inside the shed but opens up at the surface because it's so much softer than other crochet threads, so I find it works really nicely for this!


And a shot of the two finished supplemental weft bands next to a plain weave one:


And now for the pick-up patterns! Pick ups are where the pattern is created by a secondary warp (the vertical threads) that can be lifted or dropped to create the pattern. So only one weft was used for this:

♥ ♥ ♥ ♥ Celtic knots! ♥ ♥ ♥ ♥ ♥


I can't get enough of this celtic design. It's sooo cool. And the way the pattern is drafted in combination with the threads lifted and dropped on a normal shed--you really don't have to lift or drop more than 3 or 4 threads on any given row. It's too much fun.


This basket weave structure always reminds me of snakeskin, so I thought I'd try and obtain the effect. I'm not as close as I'd like, but getting there. It did give me a really cool idea for a future band. But I'm not telling!


This purple one was a pattern I designed myself on graph paper, but it involved picking up AND dropping the supplemental threads in every row and it just about made my head explode. This is why there are only about 2 inches woven on it. But I will conquer it:


I was inspired by a project (thank you Anne Dixon) in this Autumn's issue of Hand Woven magazine to weave a pleated necklace on my inkle loom. I used crochet thread for the project because it was what I had on hand, but in hindsight I should have used the size 30 or 50 thread for this, as my final product turned out super chunky. I really didn't beat down the weft either, so the ruffles wound up being bigger. Overall I am pleased with the outcome and hope to try it again soon with finer cotton. My brain is already chewing on some possibilities for integrating the technique into my other jewelry work. this done in a small scale with just one ruffle would make pretty snazzy earrings. Also I am wondering about crocheting lace along the bottom edge (again of a more delicate inkle).


Thanks for taking a peek! Happy weekend!
♥
JQ

Thursday, 9 June 2011

Tapestry update and a few side projects...

Greetings fellow earthlings!

This is what my tapestry looks like at 85 hours!


I know it seems to be progressing at a snail's pace. I've been finding it difficult to designate even 1 or 2 hours a day with my 2 year old operating at full throttle, especially since summer has hit. We are undertaking fencing and landscaping our yard. I can't believe it's been almost 2 years since we moved in! I'm hoping to have a small vegetable garden and some flower beds as well as actual GRASS! :D

On a completely separate note I just have to gush for a moment, about my super awesome hubby. He's like, the KING of thrift store bargains and has been finding the most amazing stuff at great prices! Take a look at all the yarn and crochet thread!


Not just the amazing deals but the colours he's been able to find are fabulous! I'm especially in love with the Skeins of lime green size 30. All those skeins are Daisy brand and are 400 yards per skein.

He found a whole bunch of Daisy skeins in the Pansy colourway, so I think I might save that for a big bedspread or table cloth project:


I use crochet thread in so many of my projects. I like to use it for more traditional uses like doilies and lace, but it is also what I use to make my colourful inkle bands, and inkle jewelry, and it comprises about 75% of my current tapestry, the rest being random bits of wool, silk and linen. The white and off white will be perfect for blending or for dying.

Three big cheers for a fabulous husband who is so very supportive of my vocation! ♥ ♥ ♥


Speaking of crochet thread and doilies, I made these 2 matching hot pads using caramel and chocolate brown with a bit of black. I plan to make a set of 8 matching coasters, but I need to adjust the pattern. I copied this from an old hot pad my grandma purchased at a thrift shop:


I puzzled out the pattern for this set of rainbow flower coasters as well. Big thanks to my mum in law for thinking of me when she picked them up at a yard sale! And another big thanks to her for finding me some cool colours of crochet thread recently. I am so lucky to have such a supportive family! ♥


They are two-toned. The backs are darker and bits of that dark colour show up behind the lighter colour because of a slight variation in the patterns from back to front. Now I want to find a clear glass bowl--like a candle cup-- to keep them in!


Thanks everyone for stopping in. Hope you are all having a good summer!
♥
JQ