Showing posts with label tutorial. Show all posts

Thursday, 5 September 2013

DIY Cardboard Box Inkle Loom Tutorial PART 3!

GUESS WHAT TIME IT IS!


 Remember this?


I know it's been a long time coming.  It turns out maintaining an acreage in the summertime while wrangling a 4 year old and a baby and keeping up a blog is---whaaaaaaaaaaaat?! People do this!???  I seriously NEED more hours in a day.  :) 

Thank you for following along, and for staying energized excited about this project. I hope that you will join along with me and thread up that cardboard loom so we can take it for a little test drive!

First you created an inkle loom out of a cardboard box (totally rad) and then you made some string heddles for it...now you are ready for part 3! Let's learn how to thread up that loom and start weaving an inkle!

For this you'll need your loom, 20 heddles, a pair of sharp scissors, an extra piece of cardboard to make a shuttle, a plastic ruler you get inside a geometry kit, and 4 different colours of mercerized cotton string in a uniform size (thicker is better).  I used Lily brand 8 strand cable cotton yarn from the thrift store.  Size 5 crochet thread would also work.  I DO NOT recommend you use wool, or acrylic or novelty yarns of any kind for your first few attempts.  Acrylic yarn stretches, novelty yarn catches on everything and wool will usually bind and felt a little around the heddles.  Smooth, tightly spun cotton is best. I also don't recommend using that thick baby cotton or the kind used to knit/crochet dishcloths, as that stuff is softer and loosely spun.  It will pill and fray with friction.

The tutorial is split up into six video segments. The first one is about warping the loom, and rest are a five part series about weaving your band, start to finish! 

I hope you find them helpful!  My tools were limited, but I tried the best I could to give you a good start!  Special credit goes to my loving and patient husband Justin Keller, who filmed all the segments and helped me figure out how to edit them.


Some images to help:

Threading:

This is your pattern draft.  It's done on brick layout graph paper.
You can find all kinds of graph paper, including brick layout free online.  I get my graph paper here:  http://incompetech.com/graphpaper/ .  I like it because you can set the scale and everything.  Some of the other graph papers found on that site are helpful for drafting more advance structures like basketweave pick up and horizontal bar pick-up.

And this is how you read it, left to right, according to the numbers.
 Thread 1 is royal blue and open, thread 2 is royal blue and heddled, thread 3 is white and open, etc.  You can substitute any 4 colours in this pattern, or if you are feeling even more adventurous you can mess around with several colours, just be sure you keep EACH SET of colours. So all 3 greens in the first cluster need to be the same colour, both whites that come after it need to be the same colour, then all 3 purples should be all the same colour, etc. below is one example of how youc an switch up the colour sets:

I would keep the two sets of border threads the same colour.  You can also sub colours in the white areas.  

The possibilities are endless--just with one pattern draft!

 What threading looks like from the side:


How an open thread looks on the loom
How a heddled thread looks on the loom
Weaving:

Position (shed) one.  The open threads are above the heddled threads.

Position (shed) two.  The open threads are below the heddled threads.


If you have any questions please email me at:
heartsonfibreblog (at) gmail (dot) com

Best wishes on your inkle weaving journey!
Happy Creating!

JQ

DIY CARDBOARD INKLE LOOM TUTORIAL PART 1
DIY CARDBOARD INKLE LOOM TUTORIAL PART 2: MAKING YOUR HEDDLES

Thursday, 21 February 2013

Inkle tutorial #2-Making Heddles

Hello Hello!

It's time for the second part of my three part Inkle tutorial! If you missed the first one on building your loom , click HERE.  I know for a fact this is not the only way to create heddles in inkle weaving.  I'm just showing you the cardboard loom version of the way I do it with my smaller looms.  I learned it this way from friend of mine one afternoon in college.

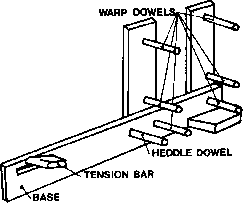
Since that tutorial I had a few questions about the two-sidedness of these looms and how they get warped.  Most of the inkle looms on the market now only have one "wall" with dowels poking out.  They look like this.  The loom I used in college looked like this.  I still have 2 double sided looms and enjoy working with them. Warping it is a little more of a pain, but it's very stable, and I remember actually weaving 5 inches wide on the one I learned with, but that's another post I think.


You will need some very strong, sturdy string for this. I recommend some kind of mattress thread or upholstery button thread, but you can also make do for now with a thick, strong sewing thread that you can't break with your fingers. Smoothness is essential to minimize fraying/breaking warp threads.I like to keep my heddles all the same length in a ziplock baggie marked for the loom I use them with.  That way I can just take out as many as I need or make more if my pattern needs. I take a measuring thread and mark both ends with a sharpie, keep it in the bag, and use it to cut all my heddles.  This way they are always the right length. 

First thing's first, run a colourful (I used red) thread from your top rear bar to your bottom front one and secure it. This will show you roughly where your band will sit as you weave.  


Next you will measure how long each heddle thread needs to be.  Without cutting, draw a good length of string off the spool.  Next take your heddle thread and loop it around the center bar,pulling both ends of the thread under and then back up around the bar and around beneath the heddle.  leave some room extra for the overhand knots.  Cut this length.  Mark the ends with a sharpie.


Don't worry about being too finicky.  As long as the string accommodates that length of red yarn, and doesn't overshoot it you should be okay.  The finicky part will be the next step.

You can cut one trial string using your  measure. Place an overhand knot about 1/4 inch from the tails, securing the two ends together and forming a loop.  Don't cut the other threads until you are sure this one will sit where you want it.


 Take the knotted end and place it behind the center bar, so that the knot is visible.


Tuck the loop end through the knotted end to secure the heddle.  Measure it against your read yarn to see if it is where you like it.  Don't worry if it's not bang on target.  just make sure it's close, and that all your heddles are the same. 


Cut each one carefully and try to place the overhand knots always in the same place on the heddle, so that the end results are all the same height when placed on the bar.  I leave about 1/4 inch tails, and have become very accurate at placing the knots.  You will find that it doesn't take much to create an uneven shed.Try your best. Make about 30.  I don't know how much inkle these little cardboard bad boys can hack, but it won't be anything much wider than that. 


TADA!!  There you have your heddles!

Bear in mind these looms are temporary things.  They probably won't stand up to the wear, tear and tension of long term weaving, so if you fall in love with the process you should definitely consider purchasing a loom.

Stay tuned for Part 3! 

Thank you very much for checking out my blog!  If there's anything you have seen in my previous posts that you'd like a tutorial on just leave me a comment!


JQ

Wednesday, 9 November 2011

DIY Cardboard Box Inkle Loom Tutorial


Hi everybody!

I have been so inspired by the tutorials I have found on other weaver's blogs, most especially Laverne over at BackstrapWeaving. WOW. She weaves totally gorgeous things with very little in the way of equipment. If you haven't been to visit already please check it out. I can't get enough of her online tutorials and informative videos. I recently purchased her ebook on Andean Pebble Weave, and it's pretty rad! I CAN'T wait to make my first backstrap and get started!

I really want to make my blog a bit more about sharing knowledge and process. Sometimes I think people might be inclined to try inkle weaving at home, but don't really know if they will enjoy the process, or do it often enough to warrant spending the money on a piece of equipment.

Today I have a picture tutorial on how you can build an inkle loom out of stuff that is easy to come by. You might even have it kicking around your house. This way you can give the process a try without spending too much money and see if it's something you could dive right into. I'll be posting about how to thread up your looms, different basic patterns and then a video on weaving your first band too! You should be able to click on any of these images for a closer look. I hope this will inspire some of you to give this process a whirl!


First of all, I clearly have trouble counting. I have one too many dowels here for the job. I used what I had around my house, and encourage you to do the same. So one of my dowels will be fatter than all the rest. They need to be at LEAST one if not two inches longer than the width of your box, so that they will stay in the holes that you cut for them.

The first thing I do is decide what end of the box will be the back of my loom. Then I measure ABOUT seven inches in from the back edge and mark. I find the bottom front end of my box and measure UP two inches from the bottom and mark. Then I use my marker and sort of loosely draw a curve that is steeper towards the top of the box and then shallows out as it moves towards the bottom front edge. You can see how I made several lines before I decided where I would make the cut. That's okay, in fact I recommend it. This isn't a beauty contest. At this point choose function over form. The shallowing out is important because you need quite a bit of room in that open front area of the loom for working. You will understand this better when you see how the loom is threaded later on. I keep the flaps in tact at the top of the box, except where I am cutting away the curves. I tape them down once the loom is cut out. I am not sure if folding in the remaining flaps inwards helps the loop stay sturdy, but that's what I did this time around.


Flip that cut out piece over and use it to trace the identical (mirror) curve on the other side of the box. Cut it out. Then draw a straight line across the bottom front of the box (where the lower end of the curved sides end) and cut that section off.


You should now have something that looks like this:
Trace the end of the dowel using the measurements in the photo below. Once again, you may have to make small adjustments in measuring based on the size of your box. The placement of this dowel does not need to be exact. Most important thing is to make sure you get things fit securely. This is where the structure is weakest so the try to avoid bending and tearing the box, and aim for the dowel to fit snugly.


Do this to the other side as well. I push the dowel through the first hole, all the way to the other side, and inspect it to get it straight, then I trace the hole again off the dowel and then cut it out.


Above is the directions for the two top dowels. Once again when the holes on one side of the box/loom are cut, I push the dowels through to the other side and carefully adjust them so they look straight, comparing them to each other, and to the back of the box, from above and below and the side. I then trace the dowel ends on the inside of the opposite side of the box and cut these out. (Note: I am cutting through the side of the box as well as through the flaps which I folded inwards. You can choose to discard the flap portion).

Now you place two more holes. One hole is at the bottom rear of the loom directly below the top rear peg, and at about level with the bottom front peg. The last hole is for the heddle bar.

It might help to run a string from the front bottom bar up to the top rear bar. The heddle bar should be placed BELOW this and slightly forward compared to the top front bar. maybe even a bit more than in my drawing. Once again I haven't provided exact measurements because your boxes may all be a bit different size.


Now that all your dowels are in place your box loom is complete and should look like this!


One of the things I can't stress enough besides getting a very strong box is to make sure your dowels are as straight as possible in the frame. A slight angle is workable, but try and be sure before you cut.


Just so you get an idea of the different possibilities, I made the loom below using a giant freezie box, some heavy cardboard tubes from inside saran wrap and tin foil, and one very large plastic knitting needle. :P I ran out of cardboard tube. The rear bottom peg is the one I will remove in order to wind my inkle around the loom as I weave. I figured the knitting needle would work best in that spot.


You can see a colourful band on here, which I have used to make a key chain and a few friendship bracelets. You can also see that I have a bit of an angle on my top rear peg. This was a little annoying but not a total project killer.

I turned up the flaps on this one and wound some packing tape around, to make the box tall enough for the rear pegs. The flaps on this box actually tapered at the edges a bit, which I believe helped the structure of the loom. It's deceptively sturdy! You could always try and trim a very slight angle onto the flaps of your box and then tape them up like this.


Okay! I hope you're getting excited about trying this bad boy out! I'll be back with a short tutorial on making the string heddles, and then we can thread up and get weaving!

Thanks for stopping by, good luck and remember to leave a note or drop me an email at heartsonfibreblog (at) gmail (dot) com if you have a question!


JQ